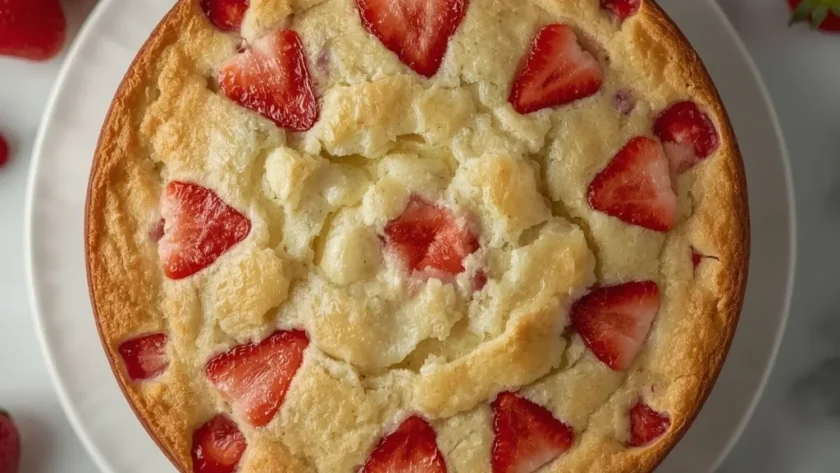
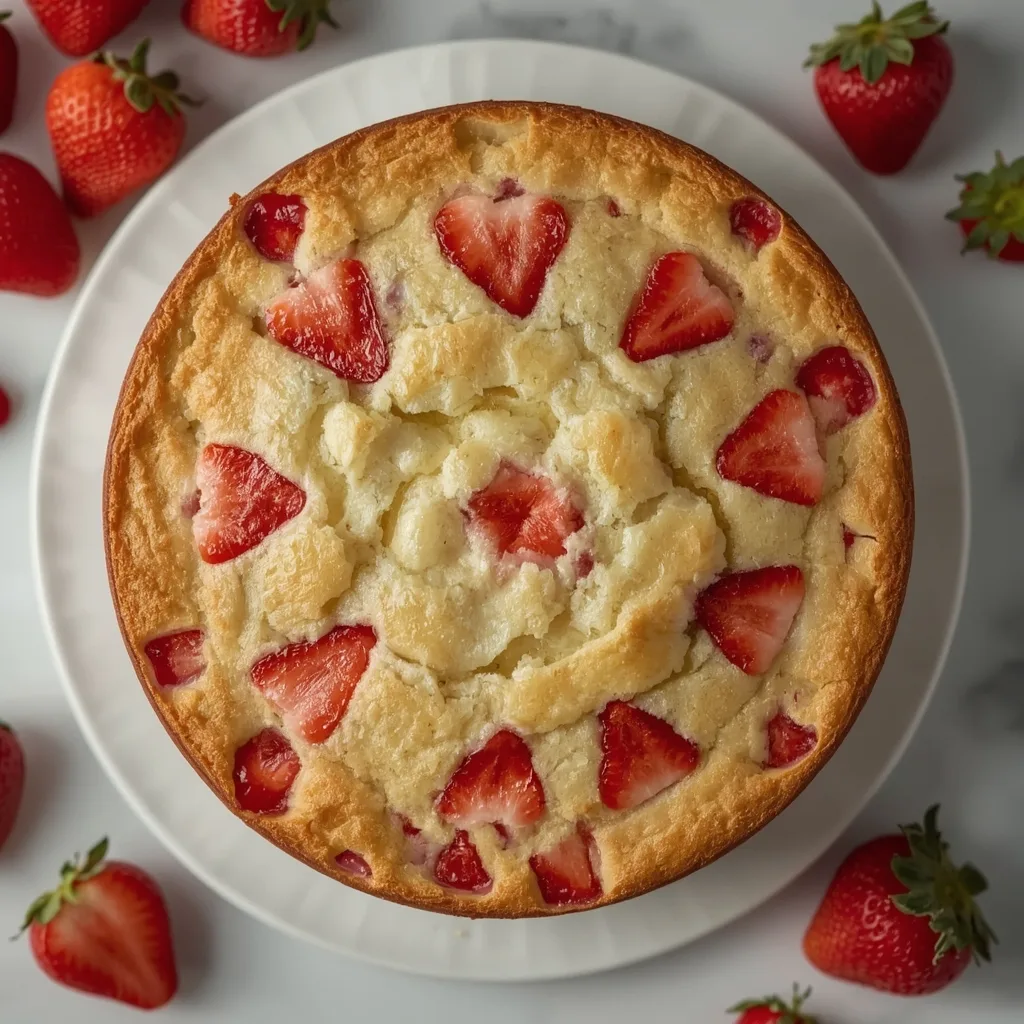
This Strawberry Pound Cake delivers exactly what a good pound cake should — a dense, tender crumb with a golden crust and pockets of fresh fruit in every slice. The vanilla undertone keeps it classic while the berries add a bright, natural sweetness.
It takes about 65 minutes total from start to finish and falls in the beginner-friendly category. The trickiest part is folding the diced strawberries without smashing them, but a light hand makes it simple.
What Is Strawberry Pound Cake?
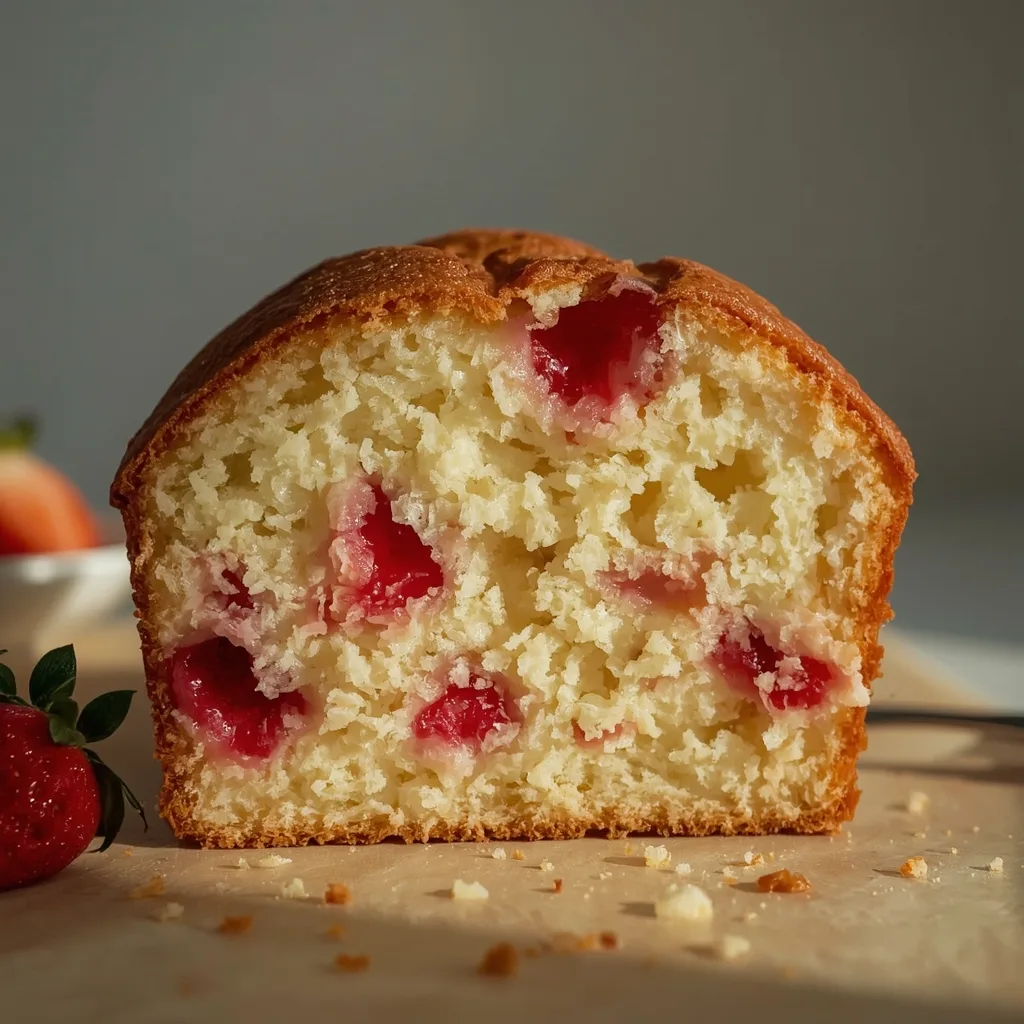
It is a small-batch American-style pound cake built from butter, sugar, eggs, flour, and fresh strawberries. The method follows the classic creaming approach — beating butter and sugar until light, then adding the wet and dry ingredients in turns. The result is a sturdy but tender loaf that holds up well for snacking, brunch, or a simple dessert.
The texture sits between dense and moist, with a fine crumb that does not crumble apart. Each slice shows tiny ruby flecks of baked strawberry throughout. It is the kind of cake you reach for when you want something straightforward, satisfying, and not overly sweet.
Reasons to Try Strawberry Pound Cake
Here is why this recipe earns a spot in your regular baking rotation.
- Small batch size — The recipe makes just 4 servings, so there is no half-eaten cake lingering for a week. Perfect for when you want a treat without the leftovers.
- Fresh fruit throughout — Diced strawberries bake into the batter instead of sitting only on top. Every bite gets a little burst of berry flavor.
- Simple pantry ingredients — Butter, sugar, flour, eggs, yogurt, and strawberries cover the list. No specialty flours or hard-to-find extracts required.
- Beginner-friendly method — If you can cream butter and sugar and fold in berries, you can make this cake. No complicated techniques or special equipment needed.
- Fast total time — Twenty minutes of prep and under an hour in the oven. It fits neatly into a weekend morning or an after-dinner baking session.
- Versatile serving options — Dust it with powdered sugar, add whipped cream, or eat it plain. It works for breakfast, dessert, or an afternoon snack.
Ingredients You Will Need
Every ingredient here plays a specific role. Here is what to grab and why each one matters.
Butter and Sugar Base
- 1/4 cup unsalted butter, softened (57g) — Butter gives the cake its rich flavor and tender structure. Softened butter creams properly with the sugar, which creates the air pockets that lighten the crumb.
- 1/2 cup granulated sugar (100g) — Standard white sugar sweetens the batter and helps with browning. It also contributes to the fine, even texture during creaming.
Wet Ingredients
- 1 large egg, room temperature — A room-temperature egg emulsifies into the butter-sugar mixture smoothly. A cold egg can cause the batter to look separated and will not incorporate as evenly.
- 1/2 teaspoon vanilla extract — Vanilla rounds out the strawberry flavor without overpowering it. Pure extract gives a cleaner taste than imitation vanilla.
- 2 tablespoons full-fat Greek yogurt, room temperature (30g) — Yogurt adds moisture and a slight tang that complements the berries. Full-fat is important here — low-fat or nonfat versions thin the batter too much.
Dry Ingredients
- 1/2 cup plus 2 tablespoons all-purpose flour (75g, spooned and leveled) — All-purpose flour provides the right structure for a pound cake. Spooning and leveling prevents packing, which would make the cake dry and dense.
- 1/2 teaspoon baking powder — Baking powder gives the cake its gentle rise. Without it, the loaf would be flat and overly heavy.
- 1/4 teaspoon kosher salt — Salt balances the sweetness and enhances the strawberry flavor. Kosher salt dissolves evenly and does not leave a metallic aftertaste.
Fruit
- 1/2 cup fresh strawberries, hulled and cut into 1/4-inch dice (about 75g) — Fresh strawberries hold their shape better than frozen during baking. Small dice ensure they distribute through the batter without sinking into a single layer.
Step-by-Step Instructions to Make Strawberry Pound Cake
Follow these steps in order, and you will have a clean, golden loaf ready in about an hour.
- Prep the pan — Preheat the oven to 350°F (177°C) with a rack in the center. Grease a 6×3-inch mini loaf pan (or 4-cup capacity pan) with butter, then dust with a tablespoon of flour, tapping out the excess. This prevents sticking and creates an even crust.
- Cream butter and sugar — In a medium mixing bowl, combine the softened butter and granulated sugar. Using a handheld electric mixer or a wooden spoon, cream them together for 2 to 3 minutes until pale, light, and fluffy. Scrape down the sides of the bowl. Proper creaming incorporates air for a tender crumb.
- Add egg and vanilla — Add the room-temperature egg and vanilla extract to the butter mixture. Beat on medium speed for 1 minute until fully combined and smooth. The mixture should look creamy and slightly aerated. If it looks separated, your egg may be too cold.
- Mix in yogurt — Add the Greek yogurt and mix on low speed just until incorporated, about 15 seconds. Do not overmix; the batter should be thick and emulsified. Full-fat yogurt adds moisture without thinning the batter.
- Combine dry ingredients — In a separate small bowl, whisk together the all-purpose flour, baking powder, and kosher salt. This distributes the leavening evenly and prevents clumps.
- Add dry ingredients in three parts — Add the dry ingredients to the butter mixture in three additions, mixing on low speed after each until just combined. Scrape the bowl halfway through. Stop as soon as the last streak of flour disappears to avoid developing gluten, which would make the cake tough.
- Fold in strawberries — Gently fold the diced strawberries into the batter with a rubber spatula. Do this in just 3 or 4 strokes so the berries stay intact. They will sink slightly during baking, creating a jeweled layer.
- Fill the pan — Scrape the batter into the prepared pan and spread it into an even layer using the spatula. Smooth the top; it will be about two-thirds full. Tap the pan gently on the counter to release any trapped air bubbles.
- Bake — Bake for 40 to 48 minutes, rotating the pan halfway through. The cake is done when the top is deep golden brown, a toothpick inserted into the center comes out clean or with a few moist crumbs (not wet batter), and the edges begin to pull away from the pan.
- Cool in the pan — Let the cake cool in the pan on a wire rack for 15 minutes. Then run a thin knife around the edges to loosen, invert onto the rack, then turn right side up to cool completely, about 1 hour. Slicing while warm may cause crumbling.
- Slice and serve — For serving, cut into 4 equal slices. Optionally dust with powdered sugar or serve with lightly sweetened whipped cream and extra fresh strawberries.
What to Serve With Strawberry Pound Cake
This cake holds its own plain, but a few simple pairings turn it into something more.
- Lightly sweetened whipped cream — A dollop of cream adds a cool, airy contrast to the dense, buttery crumb. Keep the sugar minimal so the strawberry flavor stays forward.
- Fresh strawberry slices — Extra berries on the side reinforce the fruit flavor and add a fresh, juicy counterpoint to the baked cake.
- Hot coffee or black tea — The bitterness of coffee or tea cuts through the sweetness and makes each bite taste brighter. A natural match for breakfast or an afternoon break.
- Vanilla ice cream — A small scoop melts slightly over a warm slice, creating a soft, creamy sauce. Best if you reheat the cake briefly before serving.
- Lemon glaze — Whisk together powdered sugar and a squeeze of fresh lemon juice, then drizzle over the cooled loaf. The citrus tang plays well with the berries and vanilla.
Key Tips for Making Strawberry Pound Cake
A few small details make the difference between a good loaf and a great one.
- Room temperature ingredients — Butter, egg, and yogurt all need to be at room temperature before you start. Cold ingredients do not emulsify properly, which can leave the batter grainy and the cake dense.
- Pat the strawberries dry — After dicing the berries, blot them gently with a paper towel. Excess moisture can create steam pockets in the batter and lead to a soggy streak near the bottom.
- Fold the berries last and gently — Use a rubber spatula and no more than 3 or 4 turns. Over-folding crushes the berries and tints the whole batter pink, which hides the pretty fruit flecks.
- Do not overmix the dry ingredients — Mix on low speed and stop the second the flour disappears. Overworking the gluten makes the cake tough instead of tender.
- Rotate the pan halfway through — Ovens often heat unevenly. A quick rotation at the 20-minute mark ensures the top browns evenly and the sides bake at the same rate.
- Cool completely before slicing — Warm cake crumbles easily because the structure has not fully set. Waiting the full hour on the rack gives you clean slices every time.
- Check doneness with both toothpick and look — A clean or barely crumbly toothpick plus deep golden top and pulled-away edges means it is done. Relying on only one cue can lead to underbaking.
Fun Ways to Change It Up
Once you have the base down, small tweaks create entirely new flavors.
- Lemon-berry version — Add 1 teaspoon of lemon zest along with the vanilla. The citrus brightness lifts the strawberry flavor and gives the cake a fresher profile.
- Almond twist — Replace the vanilla extract with 1/4 teaspoon of almond extract. Almond and strawberry are a classic pairing, and the nutty note adds unexpected depth.
- Gluten-free swap — Substitute the all-purpose flour with a 1-to-1 gluten-free baking blend that contains xanthan gum. The texture will be slightly more delicate but still holds together well.
- Berry medley — Replace half the strawberries with an equal amount of diced raspberries or blueberries. Mixed berries give the cake a more complex fruit flavor and a prettier color contrast.
- Streusel topping — Combine 2 tablespoons flour, 1 tablespoon sugar, and 1 tablespoon cold butter, then sprinkle over the batter before baking. The crumbly topping adds a crunchy contrast to the soft crumb.
- Dairy-free option — Use plant-based butter and a dairy-free yogurt alternatives in place of the butter and Greek yogurt. Look for full-fat versions to maintain the moisture level.
How to Store Leftovers
Proper storage keeps the cake moist and fresh for days.
- Room temperature wrap — Wrap leftover cake tightly in plastic wrap and keep it at room temperature for up to 3 days. The wrap prevents the crumb from drying out without trapping excess moisture.
- Refrigerator method — For longer storage, place the wrapped cake in an airtight container and refrigerate for up to 5 days. Bring slices to room temperature before serving to restore the texture.
- Freezer preparation — Wrap the whole loaf or individual slices in plastic wrap, then a layer of foil, and freeze for up to 3 months. Double-wrapping prevents freezer burn and flavor loss.
- Thawing instructions — Move the frozen cake to the refrigerator overnight to thaw. For a just-baked feel, reheat slices in a 300°F (150°C) oven for 5 to 7 minutes to crisp the exterior.
Best Ways to Reheat
Leftover cake comes back to life with gentle heat.
- Oven method — Place slices on a baking sheet and warm them in a 300°F (150°C) oven for 5 to 7 minutes. The low heat refreshes the crust without drying out the interior.
- Microwave approach — Heat a single slice on a microwave-safe plate for 10 to 15 seconds at medium power. The crumb softens quickly, so check after 10 seconds to avoid a rubbery texture.
- Air fryer option — Set the air fryer to 300°F (150°C) and warm the slice for 3 to 4 minutes. The circulating air restores some crispness to the outer edges while keeping the center tender.
Nutrition Value (Per Serving)
Based on 1 serving = 1 slice out of 4 total.
- Calories: 320
- Protein: 5g
- Fat: 13g
- Carbohydrates: 46g
- Fiber: about 1g
- Sugar: 27g
- Sodium: around 270mg
- Cholesterol: roughly 75mg
FAQs
Can I use frozen strawberries instead of fresh?
Fresh strawberries work best here because frozen berries release extra liquid as they thaw, which can make the batter soggy. If you only have frozen, do not thaw them first — toss the frozen diced berries directly into the flour mixture before folding them into the batter.
How long does Strawberry Pound Cake last in the fridge?
Wrapped tightly in plastic and stored in an airtight container, it stays fresh in the refrigerator for up to 5 days. Let the cake come to room temperature before serving so the crumb softens back to its original texture.
Can I freeze Strawberry Pound Cake?
Yes, it freezes well for up to 3 months. Wrap the whole loaf or individual slices in plastic wrap, then a layer of foil, and thaw overnight in the refrigerator before reheating.
Why did my cake sink in the middle?
Several things can cause sinking — opening the oven door too early, underbaking, or overmixing the batter. Stick to the 40-to-48-minute bake time and avoid peeking until the 35-minute mark.
Can I double this recipe?
Yes, double all ingredients and bake in a standard 9×5-inch loaf pan. Increase the bake time to 55 to 65 minutes, and start checking for doneness at the 50-minute mark.
What if I do not have Greek yogurt?
Full-fat sour cream works as a direct substitute. Use the same amount (2 tablespoons) and make sure it is at room temperature before mixing it into the batter.
Wrapping Up
This Strawberry Pound Cake delivers exactly what a home baker wants — straightforward steps, reliable results, and a flavor that tastes like the season. The crumb is tender, the berries are generous, and the whole thing comes together with minimal fuss. Give it a try the next time you want a small, satisfying dessert that does not require a special occasion.
PrintStrawberry Pound Cake

A tender, buttery pound cake studded with fresh strawberries, offering a burst of fruity sweetness in every slice. The crumb is dense yet moist, with a golden crust and a delicate vanilla undertone.
- Prep Time: 20
- Cook Time: 45
- Total Time: 65
- Yield: 4 1x
- Category: Dessert
- Method: Baking
- Cuisine: American
Ingredients
- 1/4 cup unsalted butter, softened (57g)
- 1/2 cup granulated sugar (100g)
- 1 large egg, room temperature
- 1/2 teaspoon vanilla extract
- 2 tablespoons full-fat Greek yogurt, room temperature (30g)
- 1/2 cup plus 2 tablespoons all-purpose flour (75g, spooned and leveled)
- 1/2 teaspoon baking powder
- 1/4 teaspoon kosher salt
- 1/2 cup fresh strawberries, hulled and cut into 1/4-inch dice (about 75g)
Instructions
- Preheat the oven to 350°F (177°C) with a rack in the center. Grease a 6×3-inch mini loaf pan (or 4-cup capacity pan) with butter, then dust with a tablespoon of flour, tapping out the excess. This prevents sticking and creates an even crust.
- In a medium mixing bowl, combine the softened butter and granulated sugar. Using a handheld electric mixer or a wooden spoon, cream them together for 2 to 3 minutes until pale, light, and fluffy. Scrape down the sides of the bowl. Proper creaming incorporates air for a tender crumb.
- Add the room-temperature egg and vanilla extract to the butter mixture. Beat on medium speed for 1 minute until fully combined and smooth. The mixture should look creamy and slightly aerated. If it looks separated, your egg may be too cold.
- Add the Greek yogurt and mix on low speed just until incorporated, about 15 seconds. Do not overmix; the batter should be thick and emulsified. Full-fat yogurt adds moisture without thinning the batter.
- In a separate small bowl, whisk together the all-purpose flour, baking powder, and kosher salt. This distributes the leavening evenly and prevents clumps.
- Add the dry ingredients to the butter mixture in three additions, mixing on low speed after each until just combined. Scrape the bowl halfway through. Stop as soon as the last streak of flour disappears to avoid developing gluten, which would make the cake tough.
- Gently fold the diced strawberries into the batter with a rubber spatula. Do this in just 3 or 4 strokes so the berries stay intact. They will sink slightly during baking, creating a jeweled layer.
- Scrape the batter into the prepared pan and spread it into an even layer using the spatula. Smooth the top; it will be about two-thirds full. Tap the pan gently on the counter to release any trapped air bubbles.
- Bake for 40 to 48 minutes, rotating the pan halfway through. The cake is done when the top is deep golden brown, a toothpick inserted into the center comes out clean or with a few moist crumbs (not wet batter), and the edges begin to pull away from the pan.
- Let the cake cool in the pan on a wire rack for 15 minutes. Then run a thin knife around the edges to loosen, invert onto the rack, then turn right side up to cool completely, about 1 hour. Slicing while warm may cause crumbling.
- For serving, cut into 4 equal slices. Optionally dust with powdered sugar or serve with lightly sweetened whipped cream and extra fresh strawberries.
Notes
Store leftover cake tightly wrapped in plastic wrap at room temperature for up to 3 days. For longer storage, refrigerate in an airtight container for up to 5 days (bring to room temperature before serving). This cake freezes well: wrap whole or slices in plastic wrap then foil, and freeze for up to 3 months. Thaw overnight in the refrigerator and reheat slices in a 300°F (150°C) oven for 5–7 minutes to refresh the crust.
Nutrition
- Calories: 320
- Sugar: 27g
- Sodium: 270mg
- Saturated Fat: 7.5g
- Carbohydrates: 46g
- Fiber: 1g
- Protein: 5g
- Cholesterol: 75mg
Keywords: strawberry pound cake, pound cake with strawberries, fresh strawberry cake, moist pound cake, American dessert, berry cake, strawberry dessert, summer cake, easy cake recipe, vanilla cake


