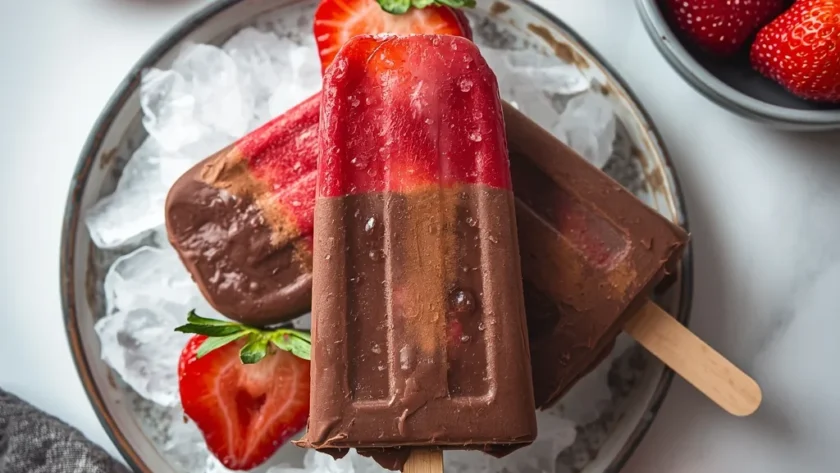
I love a frozen treat that feels a little fancy, and these Chocolate Strawberry Popsicles deliver exactly that. They combine a rich, creamy chocolate layer with a bright, fresh strawberry puree, all without turning on your oven. The total active time is just 25 minutes, making it a surprisingly simple project for a sophisticated dessert.
This recipe is naturally dairy-free, relying on full-fat coconut milk for that luxurious, melt-in-your-mouth texture. It’s the perfect make-ahead dessert for a summer party or a hot afternoon when you want something cool and indulgent.
What Is Chocolate Strawberry Popsicles?
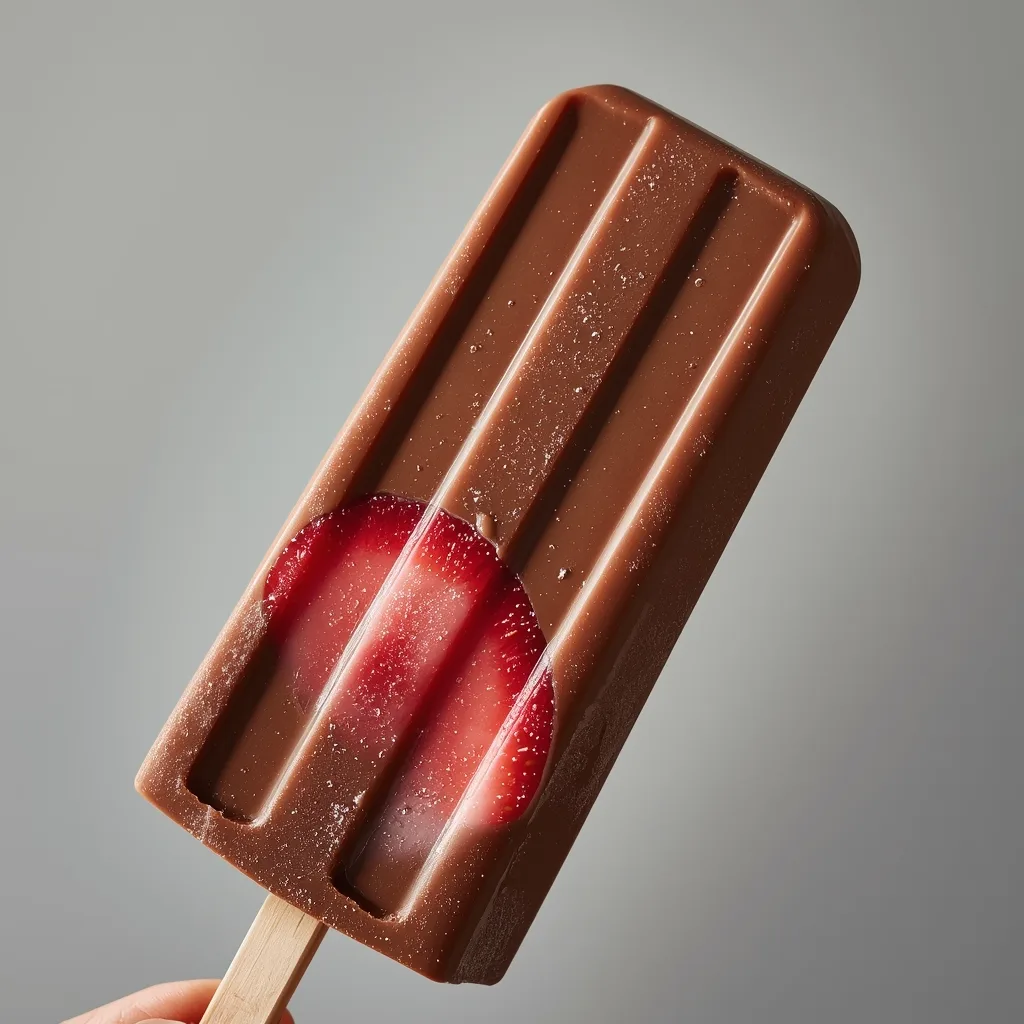
These are layered frozen desserts on a stick. You make a simple chocolate base with coconut milk and cocoa, then a fresh strawberry puree, and alternate them in a mold. It’s a no-cook method that’s popular for its elegant look and clean flavors.
The final texture is incredibly smooth and creamy, not icy. You get the deep, rich taste of dark chocolate followed by the sweet-tart punch of ripe berries. I make these all summer long when strawberries are at their peak, but they’re a welcome treat any time of year.
Reasons to Try Chocolate Strawberry Popsicles
Beyond just being delicious, here’s why this recipe has become a staple in my freezer.
- No Special Equipment Needed — You don’t need an ice cream maker. A good whisk, a blender, and a popsicle mold are all it takes to create this gourmet dessert.
- Naturally Dairy-Free & Vegan — The creamy texture comes from full-fat coconut milk, making it a fantastic option for those with dietary restrictions without sacrificing richness.
- Perfect Make-Ahead Dessert — They need at least 6 hours to freeze solid, so you can prepare them a day or even a week before you need them, freeing up your time for other things.
- Elegant Presentation — The distinct marbled or layered look makes these popsicles feel special. They’re impressive enough for a dinner party but simple enough for a weeknight.
- Controllable Sweetness — Using pure maple syrup lets you adjust the sweetness to your taste and avoids refined sugars, giving you a treat you can feel good about.
- Kid-Friendly Project — The process is straightforward and fun. Kids love helping to pour the layers and insert the sticks, making it a great activity for a warm day.
Ingredients Needed to Make Chocolate Strawberry Popsicles
You’ll be surprised how few ingredients create such a complex flavor. Here’s what you need, broken down by layer.
For the Chocolate Layer
- 1 cup full-fat coconut milk, well-shaken — This is the key to a creamy, non-icy base. Make sure to use the canned, full-fat variety, not the carton kind for drinking. Shake the can vigorously before opening to incorporate the cream.
- 1/4 cup unsweetened cocoa powder, sifted — Sifting is non-negotiable here; it prevents lumps and ensures a silky texture. A good quality natural cocoa powder provides the best chocolate flavor.
- 3 tbsp pure maple syrup — This sweetens the mixture and adds a subtle, warm depth. You could also use agave nectar if needed.
- 1 tsp pure vanilla extract — A classic flavor enhancer that rounds out the chocolate notes beautifully.
- 1/8 tsp fine sea salt — A tiny pinch makes all the difference by intensifying the chocolate and balancing the sweetness.
For the Strawberry Layer
- 1 cup fresh strawberries, hulled and quartered — Fresh, ripe berries yield the best flavor and vibrant color. Frozen strawberries can work in a pinch, but may water down the puree slightly.
- 2 tbsp pure maple syrup — Adjust this based on the natural sweetness of your berries. Tart berries might need a touch more.
- 1 tsp fresh lemon juice — This brightens the berry flavor and helps preserve that beautiful red hue. Don’t skip it.
- 1/8 tsp fine sea salt — Just like with the chocolate, a bit of salt makes the strawberry flavor pop.
Instructions to Prepare Chocolate Strawberry Popsicles
The process is simple, but a few techniques ensure those beautiful, clean layers. Follow these steps closely.
- Whisk the Chocolate Base — In a medium bowl, combine the coconut milk, sifted cocoa powder, 3 tablespoons maple syrup, vanilla, and salt. Whisk vigorously for a full 1-2 minutes until it’s completely smooth, glossy, and slightly thickened. Set this aside.
- Blend the Strawberry Puree — Place the strawberries, 2 tablespoons of maple syrup, lemon juice, and salt in a blender. Blend on high for 30-45 seconds until completely smooth and no chunks remain.
- Strain for Smoothness (Optional) — For a truly refined, seed-free texture, press the puree through a fine-mesh sieve into a clean bowl. This extra step prevents any grittiness and is worth it for a luxurious mouthfeel.
- Pour the First Chocolate Layer — Using a ladle or measuring cup, fill each popsicle mold only one-third of the way with the chocolate mixture. Gently tap the molds on the counter to settle the liquid and remove air bubbles.
- Add the Strawberry Layer Carefully — Slowly pour the strawberry puree over the back of a spoon held just above the chocolate. This technique helps the berry layer float on top without mixing, filling the mold to about two-thirds full. Tap again to settle.
- Top with Final Chocolate Layer — Carefully top each mold with the remaining chocolate mixture, leaving about 1/4 inch of space at the top for expansion during freezing. Do not overfill.
- Insert the Sticks Securely — Place the mold’s lid on or insert sticks straight down into the center. If your mold lacks a lid, cover the top with foil and poke the sticks through to hold them upright, preventing tilting.
- Freeze Until Completely Solid — Place the molds on a level surface in the freezer. Freeze for a minimum of 6 hours, but overnight (8-12 hours) is ideal for the creamiest texture and to prevent ice crystals.
- Unmold with Warm Water — To release, run the outside of the mold under warm water for 10-15 seconds, focusing on the sides. Gently pull on a stick; it should slide out smoothly. Avoid hot water or force.
- Serve Slightly Softened — Enjoy straight from the freezer, but let them sit at room temperature for 1-2 minutes before biting. This softens the exterior just enough for the perfect bite.
What Goes Well With Chocolate Strawberry Popsicles
While fantastic on their own, these popsicles can be part of a larger dessert spread. Here are a few pairing ideas.
- Fresh Berry Salad — A mix of additional berries like raspberries and blueberries provides a fresh, juicy contrast to the rich, frozen dessert.
- Whipped Coconut Cream — A dollop of lightly sweetened coconut whipped cream adds an extra layer of creamy indulgence and complements the dairy-free nature of the treat.
- Grilled Stone Fruits — Slices of grilled peach or nectarine, served warm, create a wonderful hot-and-cold sensation alongside the chilly pops.
- Sparkling Beverages — A glass of prosecco, sparkling water with a lime wedge, or even a fruity iced tea cleanses the palate between bites.
- Dark Chocolate Shavings — For the ultimate chocolate lover, sprinkle some shaved dark chocolate over the popsicle just before serving for added texture and decadence.
Key Tips for Making the Best Popsicles
A few small details make a big difference in your final result. Keep these pointers in mind.
- Sifting the Cocoa is Essential — Cocoa powder loves to clump. Sifting it directly into your wet ingredients is the only surefire way to avoid gritty bits in your smooth chocolate layer.
- Full-Fat Coconut Milk is Non-Negotiable — Light coconut milk will make your popsicles icy and thin. You need the high-fat content from the canned, full-fat version for that luxuriously creamy frozen texture.
- Patience During Freezing — Rushing the freeze time leads to a crystalline, hard texture. Letting them freeze overnight allows them to set slowly and evenly, resulting in a perfect melt-on-your-tongue consistency.
- Use the Spoon Technique for Layers — Pouring the strawberry puree over the back of a spoon disperses the force, so it lands gently on the chocolate instead of sinking in and creating a muddy mix.
- Leave Room for Expansion — That 1/4 inch of space at the top of the mold is crucial. If you fill it to the brim, the mixture will expand as it freezes and push out the sticks or leak out of the mold.
- Quality Strawberries Matter — The flavor of your strawberry layer depends entirely on the berries. Use the ripest, reddest, most fragrant strawberries you can find for the brightest, most delicious puree.
Creative Variations to Try
Once you’ve mastered the classic version, feel free to get creative with these simple twists.
- Swirl Instead of Layer — For a marbled effect, pour both batters into the mold at the same time and use a chopstick to gently swirl them together once or twice before inserting the sticks.
- Add a Crunchy Element — Before pouring the final chocolate layer, sprinkle a few mini chocolate chips or crushed freeze-dried strawberries into each mold for a fun textural surprise.
- Experiment with Different Berries — Raspberries or blackberries make a fantastic puree. Just note that seeds are more prominent, so straining becomes even more important.
- Infuse with Fresh Herbs — Steep a few fresh basil or mint leaves in the warm coconut milk (then strain and cool it) before making the chocolate base for a subtle, sophisticated herbal note.
- Make Them Nutty — Add a tablespoon of almond butter or peanut butter to the chocolate mixture before whisking for a delicious chocolate-nut flavor profile.
How to Store Your Frozen Treats
Proper storage keeps your homemade popsicles tasting fresh and prevents freezer burn.
- Keep in the Mold — If you have the space, the easiest method is to leave them in their molds with the lids on. They’ll be protected and ready to unmold one at a time.
- Transfer to an Airtight Container — Once fully frozen and unmolded, place the popsicles in a single layer in a sturdy airtight container or a heavy-duty freezer bag.
- Use Parchment Between Layers — If you need to stack them, place a sheet of parchment paper between each layer to prevent them from sticking together and damaging the surface.
- Consume Within Two Months — For the best flavor and texture, enjoy your popsicles within two months. They will remain safe to eat for up to two months, but may develop slight ice crystals over time.
Reheating Tips for Chocolate Strawberry Popsicles
Reheating isn’t really applicable here, but these are the best methods for serving if they’ve become too hard or if you need to briefly soften them.
- Brief Room Temperature Rest — Simply let the frozen popsicle sit on the counter for 2-3 minutes. This gently softens the exterior for easier biting without causing meltdown.
- Warm Water Bath for Stubborn Molds — If a popsicle won’t release, run the outside of the mold under warm water for 10-15 seconds. Never use hot water, as it will melt the treat unevenly.
- Do Not Refreeze — Once a popsicle has been unmolded and has started to melt, do not put it back in the freezer. The texture will become grainy and icy. Enjoy it immediately.
Nutrition Value (Per Serving)
Based on one serving equaling one popsicle from a batch of four.
- Calories: 178
- Protein: 2g
- Fat: 10g
- Carbohydrates: 24g
- Fiber: 3g
- Sugar: around 18g
- Sodium: 150mg
FAQs
Can I use frozen strawberries instead of fresh?
Yes, but thaw and drain them completely first. Frozen berries release a lot of water, which can make your puree too runny and lead to icy popsicles. Pat them dry after thawing for the best results.
My popsicles are too hard to bite. What went wrong?
This usually means they didn’t freeze long enough. A shorter freeze can create large ice crystals. Always aim for that full 8-12 hour freeze for a creamier texture. Also, ensure you used full-fat coconut milk, not a light version.
How long do Chocolate Strawberry Popsicles last in the freezer?
Stored properly in an airtight container, they maintain great quality for about one month. You can keep them for up to two months, but they may develop some freezer frost.
Can I make these without a popsicle mold?
Absolutely. Small paper cups, silicone muffin cups, or even an ice cube tray for mini pops work. Just cover with foil, poke a stick through, and freeze. The unmolding process is the same.
Is the strawberry straining step really necessary?
It’s optional but highly recommended for a gourmet feel. Straining removes the seeds, giving you an ultra-smooth, velvety puree. If you don’t mind the seeds, you can skip it.
Can I use honey instead of maple syrup?
You can, but the flavor will change. Maple syrup has a more neutral sweetness that lets the chocolate and strawberry shine. Honey has a stronger, distinct taste that will come through in both layers.
Wrapping Up
This recipe proves that a few simple, quality ingredients can create a dessert that feels special. The contrast between the rich chocolate and vibrant strawberry is always a hit. I hope you give these Chocolate Strawberry Popsicles a try—they’re my favorite way to celebrate berry season or just beat the heat with style.
PrintChocolate Strawberry Popsicles

These elegant popsicles feature a creamy chocolate base layered with a vibrant fresh strawberry puree. The result is a sophisticated frozen treat with rich cocoa flavor, bright berry acidity, and a perfectly smooth, creamy texture that melts evenly on the tongue.
- Prep Time: 25
- Total Time: 25
- Yield: 4 1x
- Category: Dessert
- Method: No-Cook
- Cuisine: American
Ingredients
- For the Chocolate Layer:
- 1 cup full-fat coconut milk, well-shaken
- 1/4 cup unsweetened cocoa powder, sifted
- 3 tbsp pure maple syrup
- 1 tsp pure vanilla extract
- 1/8 tsp fine sea salt
- For the Strawberry Layer:
- 1 cup fresh strawberries, hulled and quartered
- 2 tbsp pure maple syrup
- 1 tsp fresh lemon juice
- 1/8 tsp fine sea salt
Instructions
- Prepare the chocolate base: In a medium mixing bowl, combine the full-fat coconut milk, sifted cocoa powder, maple syrup, vanilla extract, and fine sea salt. Sifting the cocoa powder is crucial to prevent lumps in your final mixture, ensuring a perfectly smooth texture. Whisk vigorously for 1-2 minutes until the cocoa is fully dissolved and the mixture is completely homogenous, glossy, and slightly thickened. Set aside at room temperature while you prepare the strawberry layer.
- Make the strawberry puree: Place the hulled and quartered strawberries, maple syrup, fresh lemon juice, and fine sea salt in a high-speed blender or food processor. The lemon juice brightens the berry flavor and helps preserve the vibrant red color. Blend on high for 30-45 seconds until the mixture is completely smooth, with no visible chunks of fruit remaining.
- Strain the strawberry puree (optional but recommended): For an ultra-smooth, seed-free texture, pour the puree through a fine-mesh sieve into a clean bowl, using a rubber spatula to press it through. Discard the seeds and pulp left in the sieve. This step creates a more refined mouthfeel and prevents gritty bits in your popsicles.
- Assemble the popsicles in layers: Have your popsicle molds and sticks ready. Using a small ladle or measuring cup, carefully pour the chocolate mixture into each mold, filling them only one-third of the way. Tap the molds gently on the counter to settle the mixture and remove any air bubbles. This first layer provides a solid chocolate base.
- Add the strawberry layer: Slowly pour the strawberry puree over the back of a spoon held just above the chocolate layer to create a clean, distinct second layer, filling the molds to about two-thirds full. The spoon technique prevents the two mixtures from mixing prematurely, ensuring sharp visual layers. Tap the molds again to settle.
- Complete with the final chocolate layer: Carefully top each mold with the remaining chocolate mixture, leaving about 1/4 inch of space at the top to allow for expansion as the popsicles freeze. Do not overfill, or the mixture will push out the sticks as it expands.
- Insert popsicle sticks: Place the lid on your mold (if it has a built-in stick holder) or carefully insert the sticks straight down into the center of each popsicle, pushing until the tip touches the bottom of the mold. If your mold doesn’t have a lid, cover the top with a small piece of aluminum foil and poke the stick through the foil to hold it upright. This prevents the sticks from tilting as the mixture freezes.
- Freeze until solid: Place the molds on a level surface in the freezer. Freeze for a minimum of 6 hours, but ideally overnight (8-12 hours), to ensure the popsicles are completely firm throughout. A longer freeze prevents a icy, crystalline texture.
- Unmold the popsicles: When ready to serve, remove the molds from the freezer. If they are stubborn, run the outside of the mold under warm (not hot) water for 10-15 seconds, focusing on the sides and bottom. Gently pull on a stick to release; it should slide out smoothly. Do not use hot water or excessive force, as this can cause the popsicle to break or melt unevenly.
- Serve immediately: Enjoy the popsicles directly from the freezer. For the best texture and flavor, let them sit at room temperature for 1-2 minutes before biting to slightly soften the exterior.
Notes
Storage: Keep popsicles in their molds or transfer unmolded popsicles to an airtight freezer bag or container with parchment paper between layers. They will keep for up to 2 months in the freezer. For best texture and flavor, consume within 1 month. Do not refreeze after unmolding if partially melted. No reheating required—serve frozen.
Nutrition
- Calories: 178
- Sugar: 18g
- Sodium: 150mg
- Saturated Fat: 8g
- Carbohydrates: 24g
- Fiber: 3g
- Protein: 2g
- Cholesterol: 0mg
Keywords: chocolate strawberry popsicles, strawberry chocolate popsicles, homemade popsicles, no-cook dessert, summer dessert, frozen treat, chocolate strawberry dessert, kid-friendly dessert, healthy dessert, easy dessert, creamy popsicles, fruit and chocolate


