I love a dessert that feels fancy but doesn’t require turning on the oven. These No-Bake Chocolate Strawberry Cheesecake Bars are exactly that. They combine a chocolate cookie crust, a creamy strawberry filling, and a rich ganache topping into one stunning treat. The total hands-on time is about 35 minutes, but you’ll need to plan for chilling, making it a perfect make-ahead dessert for a dinner party or a special weekend treat.
This recipe is beginner-friendly, relying on simple techniques like whipping cream and making a quick stovetop puree. The result is a dessert with layers of flavor and texture that will impress anyone. It’s a classic American no-bake cheesecake, elevated with fresh fruit and deep chocolate notes.
What are No-Bake Chocolate Strawberry Cheesecake Bars?
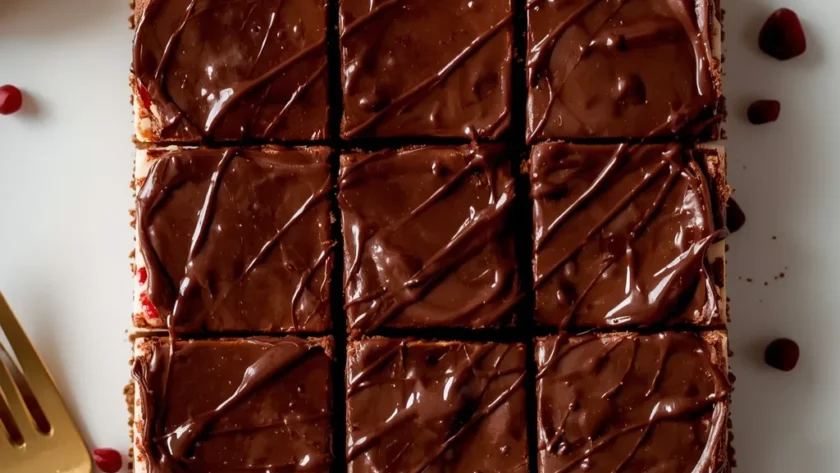
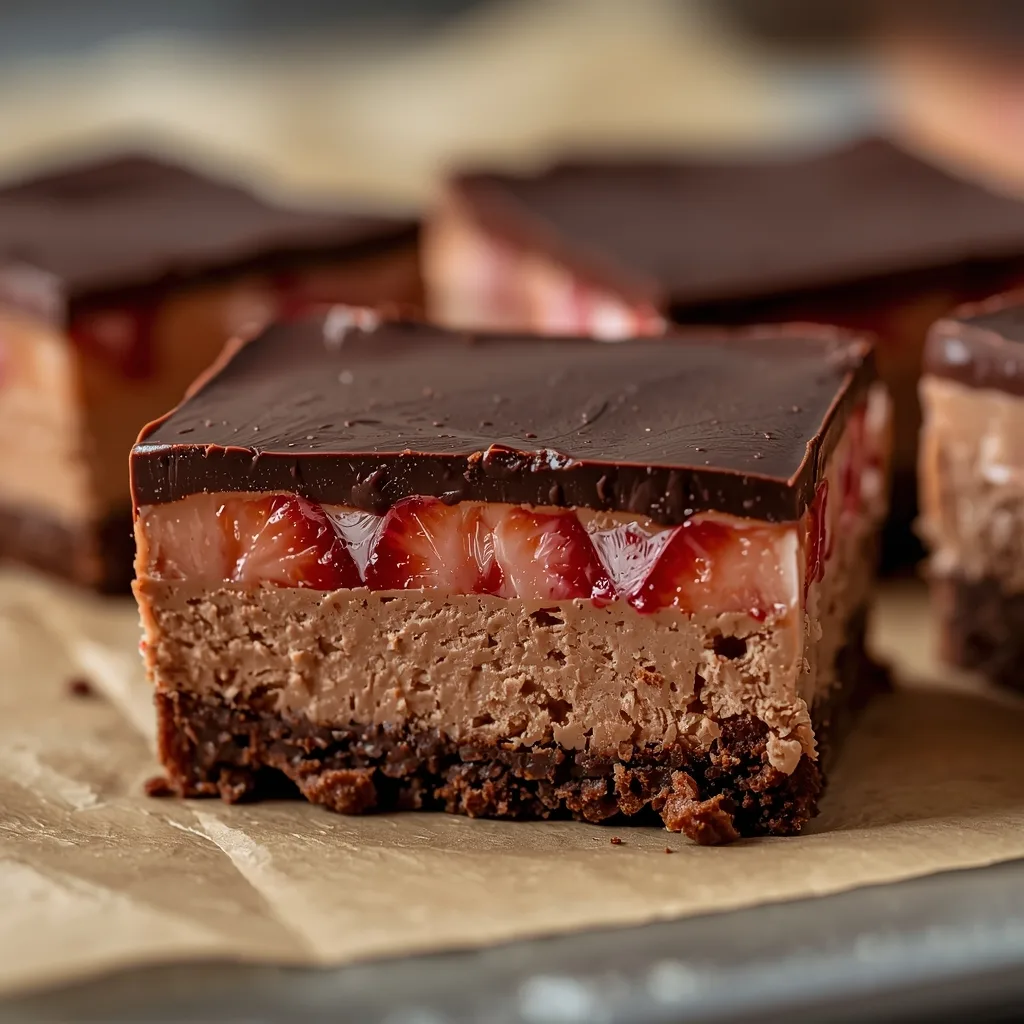
This is a layered dessert bar built on a crushed cookie crust. You mix chocolate sandwich cookies with butter, press them into a pan, and chill them. The filling is a fluffy mixture of cream cheese, sweetened strawberry puree, and whipped cream. A simple chocolate ganache poured on top seals the deal.
The texture is wonderfully creamy and smooth, with a slight tang from the cream cheese balancing the sweet berries. The chocolate crust and topping add a rich, almost bitter contrast that keeps each bite interesting. I make these for summer gatherings when berries are at their peak, but they’re a welcome bright spot any time of year.
Reasons to Try No-Bake Chocolate Strawberry Cheesecake Bars
Here’s why this recipe has earned a permanent spot in my dessert rotation.
- No Oven Required — This is the ultimate summer-friendly dessert. You can make it on the hottest day without heating up your kitchen.
- Make-Ahead Magic — The flavor and texture actually improve after a night in the fridge, making it stress-free for entertaining.
- Incredible Texture Contrast — You get a firm, crunchy base, a cloud-like filling, and a smooth, fudgy topping all in one bite.
- Customizable Flavors — The strawberry layer is a perfect canvas. You can easily swap the fruit puree for raspberry, blueberry, or even lemon curd.
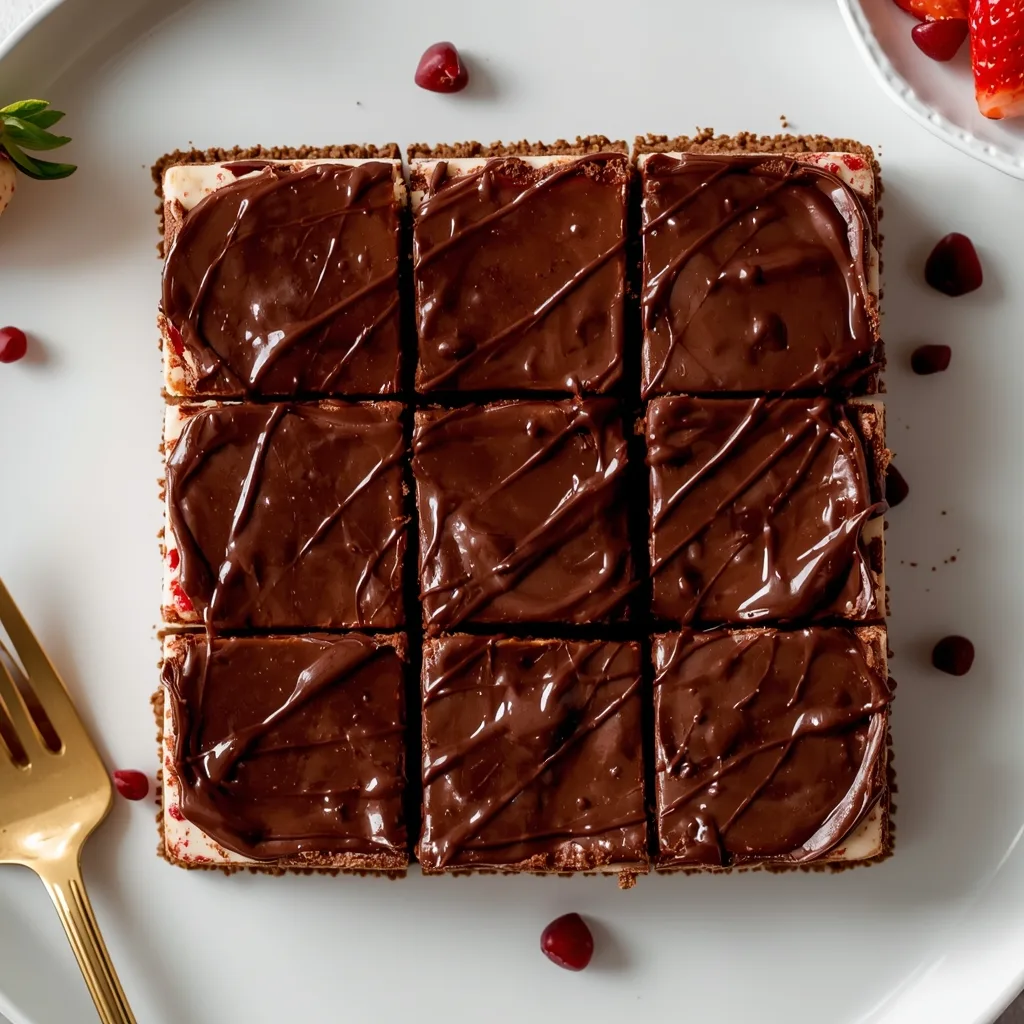
- Visually Impressive — The clean layers and glossy chocolate ganache make it look like it came from a professional bakery.
- Beginner-Friendly — If you can whip cream and use a mixer, you can absolutely master this no-bake cheesecake.
Ingredients Needed to Make No-Bake Chocolate Strawberry Cheesecake Bars
You probably have a few of these items already. Using full-fat dairy is non-negotiable here for the proper set and richness.
For the Chocolate Cookie Crust
- 1 1/2 cups chocolate sandwich cookie crumbs — This provides the chocolatey, slightly salty base. I use a food processor to crush about 18 cookies, filling and all, for the easiest crumbs.
- 5 tbsp unsalted butter, melted — This acts as the glue that holds the crust together. Make sure it’s cooled slightly so it doesn’t make the crumbs greasy.
- 1/8 tsp fine sea salt — A tiny pinch enhances the chocolate flavor and balances the sweetness of the other layers.
For the Strawberry Cheesecake Filling
- 8 oz fresh strawberries, hulled and chopped — Fresh berries give the best, brightest flavor for the puree. Frozen won’t work as well here due to excess water.
- 1 tbsp granulated sugar — This draws out the strawberries’ juices as they cook, creating a more concentrated puree.
- 1 tsp fresh lemon juice — A bit of acid brightens the strawberry flavor and helps balance the richness of the cream cheese.
- 12 oz full-fat cream cheese, softened — This is the star of the filling. Let it sit out for an hour until it’s completely soft to avoid a lumpy mixture.
- 1/2 cup powdered sugar, sifted — Powdered sugar dissolves instantly into the cream cheese for a silky texture. Sifting prevents little lumps.
- 1 tsp pure vanilla extract — A classic flavor enhancer that works beautifully with both the berry and cream cheese notes.
- 1 cup heavy whipping cream, cold — Whipping this to stiff peaks is what gives the filling its light, mousse-like body instead of a dense, heavy one.
For the Chocolate Ganache & Garnish
- 3 oz semi-sweet chocolate, finely chopped — Use a bar of chocolate, not chips, for the smoothest, shiniest ganache topping.
- 1/4 cup heavy whipping cream — Heated cream melts the chocolate into a pourable glaze.
- 1 tbsp unsalted butter, at room temperature — Stirred in at the end, this adds extra shine and a softer set to the ganache.
- Pinch of fine sea salt — Just a touch makes the chocolate flavor taste deeper and more complex.
- 4 fresh strawberries, thinly sliced & 1 tsp powdered sugar (optional) — These are for a pretty finish. A light dusting of sugar makes the sliced berries glisten.
Instructions to Prepare No-Bake Chocolate Strawberry Cheesecake Bars
The process is all about building layers and allowing proper chilling time in between. Don’t rush the setting steps.
- Prepare the Crust — Mix the cookie crumbs, melted butter, and salt until it looks like wet sand. Press it firmly into a parchment-lined 8×8-inch dish. Chilling it for at least 20 minutes is crucial for a sliceable base.
- Make the Strawberry Puree — Cook the chopped strawberries, sugar, and lemon juice over medium heat for 5-7 minutes until soft and juicy. Puree until smooth, then strain to remove seeds. Let this cool completely before using.
- Beat the Cream Cheese — In a mixer, beat the softened cream cheese for 2-3 minutes until it’s completely smooth and lump-free. Scrape the bowl well.
- Add Sweetener and Vanilla — Beat in the sifted powdered sugar and vanilla on low, then medium speed, until fully incorporated and creamy.
- Incorporate the Puree — Add the cooled strawberry puree to the cream cheese and beat on low just until you have a uniform pink mixture. Transfer it to another bowl.
- Whip the Cream — In a clean, dry mixer bowl, whip the cold heavy cream to stiff peaks. This takes about 2-3 minutes on medium-high speed. Don’t over-whip it.
- Fold Everything Together — Gently fold about a third of the whipped cream into the strawberry mixture to lighten it. Then fold in the rest until no white streaks remain.
- Assemble the Bars — Pour the filling over the chilled crust and spread it evenly. Cover and refrigerate for at least 3 hours, or overnight, until completely firm.
- Make the Chocolate Ganache — Place chopped chocolate in a bowl. Heat the 1/4 cup of cream until it just simmers, then pour it over the chocolate. Let it sit for 2 minutes.
- Finish the Ganache — Add the butter and salt, then whisk gently from the center out until smooth and glossy. Let it cool for 5-10 minutes until slightly thickened.
- Add the Topping — Pour the ganache over the set cheesecake layer and tilt the dish to spread it thinly. Chill again for 30 minutes to set the chocolate.
- Slice and Serve — Lift the slab out using the parchment. Use a large, sharp knife dipped in hot water and wiped dry between cuts for perfectly clean slices. Cut into 4 large bars.
- Garnish and Final Chill — Add strawberry slices and a dusting of powdered sugar if desired. Let the bars sit at room temperature for 5-10 minutes before serving for the creamiest texture.
What Goes Well With No-Bake Chocolate Strawberry Cheesecake Bars
This rich dessert stands beautifully on its own, but a few simple pairings can turn it into a full dessert course.
- Fresh Berries — A small side of raspberries or blueberries adds a fresh, tart contrast to the sweet, creamy bars.
- Whipped Cream — A dollop of lightly sweetened whipped cream on the side is never a bad idea for an extra indulgent touch.
- Sparkling Wine — A glass of Prosecco or Champagne cuts through the richness with its bubbles and acidity, making a perfect celebratory pairing.
- Coffee or Espresso — A strong cup of black coffee or a shot of espresso balances the sweetness and makes for a lovely end to a meal.
- Vanilla Ice Cream — For the ultimate indulgence, serve a bar slightly warmed with a scoop of high-quality vanilla bean ice cream.
Key Tips for Making No-Bake Chocolate Strawberry Cheesecake Bars
A few small details make a huge difference in the final result. Here is what I’ve learned from testing this recipe.
- Room Temperature Cream Cheese — This is the single most important tip. Cold cream cheese will leave tiny lumps in your filling no matter how long you mix it.
- Completely Cooled Puree — Adding warm puree to the cream cheese will melt the fat, causing the filling to separate and become soupy. Patience is key.
- A Clean Bowl for Whipping — Any trace of fat (like leftover cream cheese) in your whipping bowl will prevent the cream from reaching stiff peaks.
- Gentle Folding — Use a wide rubber spatula and fold the whipped cream in gently. Overmixing will deflate the air you just whipped in, resulting in a denser filling.
- Don’t Skip the Chill Times — Each chilling step sets a layer. Rushing the initial crust chill can lead to a crumbly base, and not letting the filling set fully will make slicing messy.
- Hot Knife for Slicing — Dipping your knife in hot water and wiping it clean between each cut is the secret to getting those pristine, restaurant-quality layers.
- Serve Slightly Tempered — Letting the bars sit out for 5-10 minutes before serving softens the filling just enough to be luxuriously creamy, not rock-hard cold.
Creative Variations of No-Bake Chocolate Strawberry Cheesecake Bars
Once you master the basic formula, it’s easy to play with flavors. These are some of my favorite twists.
- Different Berry Purees — Swap the strawberries for an equal amount of raspberries or blackberries. Raspberry pairs especially well with the chocolate.
- Citrus Zest Infusion — Add the zest of one lemon or orange to the cream cheese mixture for a bright, fragrant note.
- Cookie Crust Alternatives — Use graham cracker crumbs, gingersnaps, or even vanilla wafers for a different flavor profile in the base.
- White Chocolate Ganache — Replace the semi-sweet chocolate in the topping with white chocolate for a sweeter, creamier look and taste.
- Mini Individual Servings — Layer the crust and filling in small mason jars or dessert cups for easy, portable individual portions.
- Add a Nutty Crunch — Stir 1/4 cup of finely chopped toasted almonds or pecans into the cookie crust mixture for added texture.
Storage Guidelines for No-Bake Chocolate Strawberry Cheesecake Bars
Proper storage keeps the texture perfect and prevents the flavors from mingling too much.
- Refrigerator Storage — Keep bars tightly covered with plastic wrap or in an airtight container. They will stay fresh for up to 5 days.
- Freezing for Long-Term — Place bars on a parchment-lined sheet and freeze until solid (about 2 hours). Then wrap each individually and store in a freezer bag for up to 2 months.
- Thawing Frozen Bars — Always thaw frozen cheesecake bars overnight in the refrigerator. This prevents condensation from making the crust soggy.
- Avoiding Moisture — The strawberry layer may release a little juice over time. Placing a paper towel under the bars in the container can help absorb it.
- Garnish When Serving — If using fresh strawberry slices on top, add them just before serving to keep them from wilting or leaking moisture.
Reheating Tips for No-Bake Chocolate Strawberry Cheesecake Bars
This is a chilled dessert, so “reheating” isn’t really applicable. However, serving it at the right temperature is key.
- Brief Counter Rest — The best method is simply to let the refrigerated bars sit at room temperature for 5 to 10 minutes before serving. This softens the filling perfectly.
- Avoid Direct Heat — Do not microwave or warm these in the oven. The cream cheese filling will soften too much and lose its structure, and the ganache may melt into a mess.
- Serve Chilled from Freezer — For a firmer, almost ice-cream-like texture, you can eat a frozen bar directly from the freezer, though I prefer the thawed texture.
Nutrition Value (Per Serving)
Based on 1 serving = 1 large bar out of 4 total. This is a rich, decadent dessert meant for sharing.
- Calories: 985
- Protein: 11g
- Fat: 84g
- Carbohydrates: 58g
- Fiber: 3g
- Sugar: around 41g
- Sodium: 420mg
FAQs
Can I use frozen strawberries instead of fresh?
I don’t recommend it for this specific recipe. Frozen berries release a lot more water when thawed and cooked, which can make your puree too watery and prevent the filling from setting properly. Fresh strawberries give the best flavor and consistency.
How long do No-Bake Chocolate Strawberry Cheesecake Bars need to set?
The crust needs at least 20 minutes. The filling layer requires a minimum of 3 hours in the fridge, but I strongly recommend letting it set overnight. The ganache topping needs another 30 minutes to firm up. Plan for this inactive chilling time.
My ganache turned out grainy. What happened?
Graininess usually means the cream was too hot and caused the chocolate to “seize,” or it wasn’t whisked smoothly. Make sure your cream is just simmering, not boiling. If bits remain, place the bowl over a pan of barely simmering water for 10 seconds, then whisk again.
Can I make these bars gluten-free?
Absolutely. Simply use your favorite gluten-free chocolate sandwich cookies for the crust. All other ingredients are naturally gluten-free, but always check labels on items like vanilla extract to be sure.
Why is my cheesecake filling runny?
The most common culprits are warm strawberry puree or under-whipped cream. Ensure your puree is completely cool to room temperature before adding it. Also, whip your heavy cream until it holds very stiff peaks—it should not slump when you lift the whisk.
How far in advance can I make No-Bake Chocolate Strawberry Cheesecake Bars?
They are an excellent make-ahead dessert. You can assemble the entire dessert (through adding the ganache) up to 2 days in advance. Store it covered in the refrigerator. Add any fresh strawberry garnish just before serving.
Wrapping Up
This recipe proves you don’t need complex techniques or a hot oven to create a truly show-stopping dessert. The layers of chocolate, creamy strawberry, and rich ganache come together in a way that feels special every time. I hope you give these No-Bake Chocolate Strawberry Cheesecake Bars a try for your next celebration—or just because it’s Tuesday. Happy no-baking!
PrintNo-Bake Chocolate Strawberry Cheesecake Bars

These elegant cheesecake bars feature a rich chocolate cookie crust, a velvety no-bake cheesecake layer infused with fresh strawberry puree, and a glossy chocolate ganache topping. The texture is perfectly creamy and smooth, with a delightful balance of tangy cream cheese, sweet berries, and deep chocolate notes.
- Prep Time: 35
- Total Time: 275
- Yield: 4 1x
- Category: Dessert
- Method: No-Cook
- Cuisine: American
Ingredients
- For the Crust:
- 1 1/2 cups chocolate sandwich cookie crumbs (from about 18 cookies, finely crushed)
- 5 tbsp unsalted butter, melted and cooled slightly
- 1/8 tsp fine sea salt
- For the Strawberry Cheesecake Filling:
- 8 oz fresh strawberries, hulled and roughly chopped
- 1 tbsp granulated sugar
- 1 tsp fresh lemon juice
- 12 oz full-fat cream cheese, softened to room temperature
- 1/2 cup powdered sugar, sifted
- 1 tsp pure vanilla extract
- 1 cup heavy whipping cream, cold
- For the Chocolate Ganache Topping:
- 3 oz semi-sweet chocolate, finely chopped
- 1/4 cup heavy whipping cream
- 1 tbsp unsalted butter, at room temperature
- Pinch of fine sea salt
- For Garnish (Optional):
- 4 fresh strawberries, thinly sliced
- 1 tsp powdered sugar, for dusting
Instructions
- Prepare the crust: In a medium bowl, combine the finely crushed chocolate cookie crumbs, melted butter, and salt. Mix with a fork until the crumbs are uniformly moistened and resemble wet sand. Press this mixture firmly and evenly into the bottom of an 8×8-inch square baking dish lined with parchment paper. Use the bottom of a flat measuring cup to compact it into a solid, even layer. Chill in the refrigerator for at least 20 minutes to set. This chilling step is crucial for a crust that holds together when sliced.
- Make the strawberry puree: While the crust chills, combine the chopped strawberries, granulated sugar, and lemon juice in a small saucepan. Cook over medium heat, stirring occasionally, for 5-7 minutes until the strawberries have broken down and released their juices. The mixture should be bubbling gently. Remove from heat and let it cool for 5 minutes, then transfer to a blender or food processor. Puree until completely smooth, about 30 seconds. Strain the puree through a fine-mesh sieve into a bowl to remove seeds, pressing with a spatula. Let the puree cool completely to room temperature; placing it in the refrigerator will speed this up.
- Start the cheesecake filling: In the bowl of a stand mixer fitted with the paddle attachment, or using a large bowl and a hand mixer, beat the softened cream cheese on medium speed for 2-3 minutes until it is completely smooth, creamy, and free of any lumps. Scrape down the bowl and beater thoroughly with a rubber spatula. Any lumps now will remain in the final filling.
- Sweeten the filling: Add the sifted powdered sugar and vanilla extract to the beaten cream cheese. Beat on low speed for 30 seconds to incorporate, then increase to medium speed and beat for another 1-2 minutes until the mixture is smooth and well combined. Scrape down the bowl again to ensure even mixing.
- Incorporate the strawberry puree: Add the completely cooled strawberry puree to the cream cheese mixture. Beat on low speed just until the puree is fully incorporated and the mixture is a uniform pale pink color, about 1 minute. Avoid overmixing at this stage. Transfer this strawberry-cream cheese mixture to a clean bowl and set aside. Rinse and dry the mixer bowl thoroughly.
- Whip the cream: Pour the cold heavy whipping cream into the clean, dry mixer bowl. Using the whisk attachment, whip the cream on medium-high speed until it reaches stiff peaks, about 2-3 minutes. The cream should hold its shape firmly when the whisk is lifted. Do not overwhip, or it will become grainy and turn into butter.
- Fold everything together: Add about one-third of the whipped cream to the strawberry-cream cheese mixture. Use a rubber spatula to gently fold it in to lighten the base. Once incorporated, add the remaining whipped cream and fold gently but thoroughly until no white streaks remain. The goal is a light, airy, and homogenous filling without deflating the whipped cream.
- Assemble the bars: Retrieve the chilled crust from the refrigerator. Pour the strawberry cheesecake filling over the crust. Use an offset spatula to spread it into an even layer, gently tapping the dish on the counter to remove any air bubbles. Cover the dish tightly with plastic wrap and refrigerate for a minimum of 3 hours, or preferably overnight, to allow the filling to set completely. It should be firm to the touch.
- Make the chocolate ganache: Place the finely chopped chocolate in a heatproof bowl. In a small saucepan, heat the 1/4 cup of heavy cream over medium heat until it just begins to simmer around the edges; small bubbles will form. Do not let it boil vigorously. Immediately pour the hot cream over the chopped chocolate. Let it sit undisturbed for 2 minutes to melt the chocolate.
- Finish the ganache: After 2 minutes, add the room-temperature butter and a pinch of salt to the chocolate and cream. Starting in the center, gently whisk in small circles until the mixture is completely smooth, glossy, and emulsified. If any unmelted chocolate remains, you can place the bowl over a pan of barely simmering water (double boiler) for 10-15 seconds, then whisk again. Let the ganache cool for 5-10 minutes until it is slightly thickened but still pourable.
- Add the topping: Pour the slightly cooled ganache over the fully set cheesecake layer. Tilt the dish gently to spread the ganache into a thin, even layer that covers the entire surface. Return the dish to the refrigerator for at least 30 minutes to allow the ganache to set. It will lose its shine and become firm.
- Slice and serve: Once fully set, use the parchment paper overhang to lift the entire cheesecake slab out of the dish and onto a cutting board. Use a large, sharp knife dipped in hot water and wiped dry between each cut to make clean slices. For 4 large bars, cut the slab into 4 equal rectangles. Wiping the knife ensures clean, professional-looking layers without smearing.
- Garnish and final chill: If desired, arrange thin slices of fresh strawberry on top of each bar. Dust very lightly with powdered sugar using a fine-mesh sieve. For the best texture and flavor, let the bars sit at room temperature for 5-10 minutes before serving. This slight warming makes the filling incredibly creamy.
Notes
Storage: Store bars tightly covered in the refrigerator for up to 5 days. The strawberry layer may release a little moisture over time, but the flavor remains excellent. Freezing: For longer storage, place bars on a parchment-lined baking sheet and freeze until solid (about 2 hours), then wrap individually in plastic wrap and place in a freezer bag or airtight container. Freeze for up to 2 months. Thaw overnight in the refrigerator before serving. Reheating: Not applicable for this no-bake dessert. Serve chilled or slightly tempered at room temperature.
Nutrition
- Calories: 985
- Sugar: 41g
- Sodium: 420mg
- Saturated Fat: 50g
- Carbohydrates: 58g
- Fiber: 3g
- Protein: 11g
- Cholesterol: 205mg
Keywords: no-bake chocolate strawberry cheesecake bars, no-bake cheesecake bars, strawberry cheesecake bars, chocolate strawberry dessert, no-bake dessert, summer cheesecake, easy cheesecake recipe, creamy cheesecake, chocolate ganache, fresh strawberry puree


