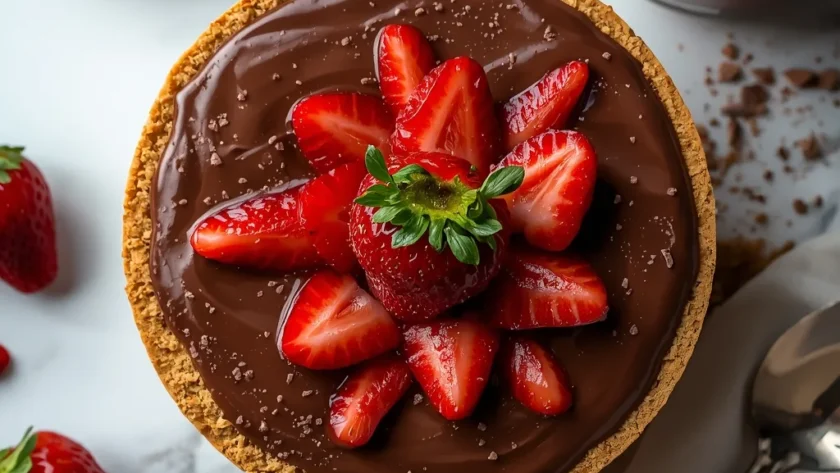
I love a dessert that looks like it took all day but secretly comes together in under an hour. This No-Bake Chocolate Strawberry Pudding Dessert is exactly that—a stunning, layered treat perfect for a dinner party or a special weeknight. With a buttery graham cracker crust, a rich homemade chocolate pudding, and a bright strawberry topping, it delivers serious luxury without turning on your oven. You can have it ready to chill in about 35 minutes.
It’s an ideal make-ahead dessert for summer entertaining or any occasion where you want something cool and impressive. The layers set up beautifully in the fridge, becoming sliceable and elegant in their individual glasses.
What Is No-Bake Chocolate Strawberry Pudding Dessert?
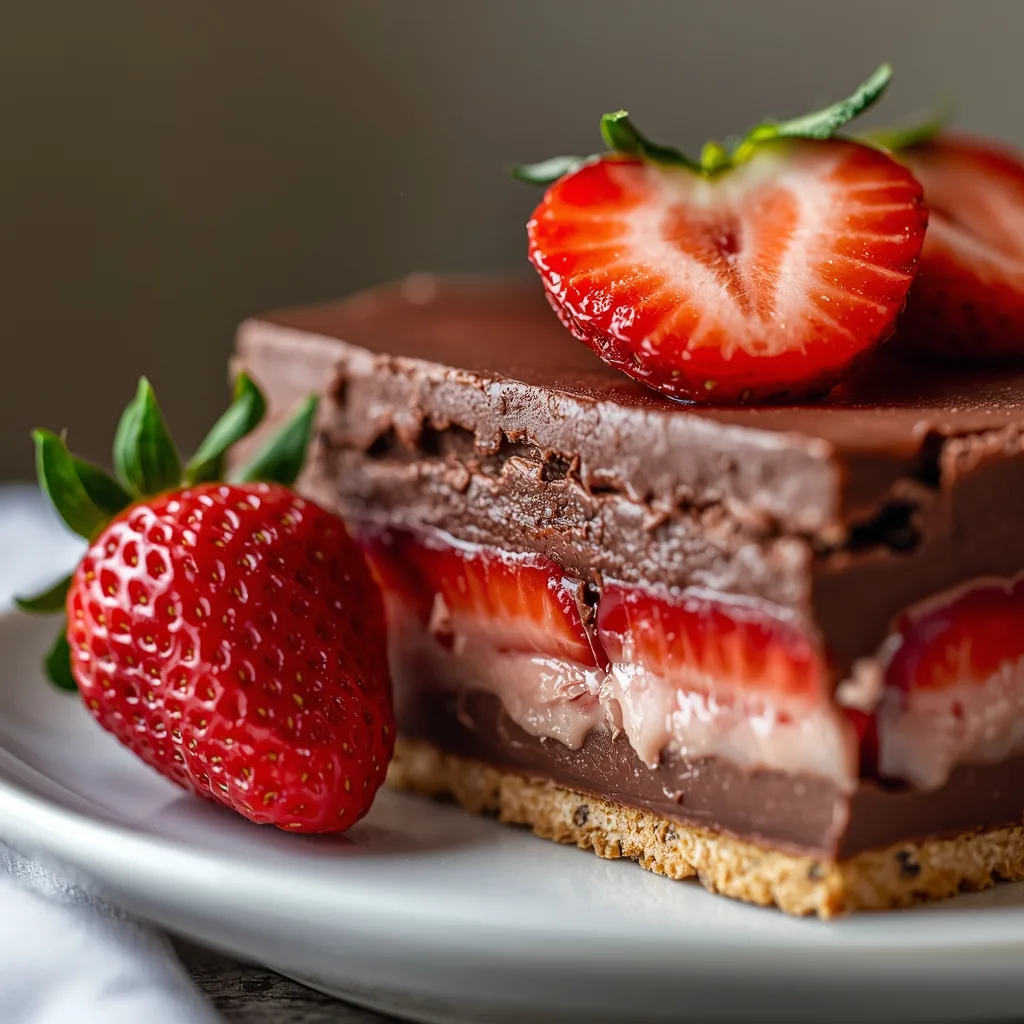
Think of it as a deconstructed, gourmet version of a classic pudding cup. It has three distinct layers: a pressed graham cracker crust, a from-scratch chocolate pudding made with real dark chocolate, and a fresh macerated strawberry topping. This kind of chilled dessert is a staple of American potlucks and family gatherings, updated here for a more refined presentation.
The texture is a fantastic contrast—the crust is crisp and sandy, the pudding is luxuriously smooth and creamy, and the strawberries are juicy with a hint of tartness. It’s the kind of dessert you make when you want to end a meal on a high note without the stress of baking.
Reasons to Try No-Bake Chocolate Strawberry Pudding Dessert
Beyond just tasting incredible, here’s why this recipe earns a permanent spot in my rotation.
- No Oven Required — This is a lifesaver during hot weather or when your oven is already occupied with the main course. The entire dessert is set in the refrigerator.
- Make-Ahead Magic — It needs at least 4 hours to set, so you can prepare it the day before a party. This makes timing the rest of your meal so much easier.
- Elegant Individual Servings — Serving it in glasses or ramekins looks beautiful and eliminates the mess of slicing and plating a larger dessert. Everyone gets their own perfect parfait.
- Real Chocolate Flavor — Using chopped dark chocolate, not just cocoa powder, gives the pudding layer an intense, grown-up depth that instant mixes can’t match.
Ingredients Needed to Make No-Bake Chocolate Strawberry Pudding Dessert
You’ll notice the ingredient list is broken into four logical parts. I find this makes assembling the layers much smoother.
For the Crust
- 1 1/2 cups graham cracker crumbs — This is about 12 full sheets, crushed finely. They form the sturdy, sweet base that holds everything together.
- 1/4 cup granulated sugar — A little extra sweetness balances the slight bitterness of the crackers.
- 6 tbsp unsalted butter, melted — The binder. Make sure it’s cooled slightly so it doesn’t make the crumbs greasy.
- 1/8 tsp fine sea salt — Just a pinch enhances all the other flavors in the crust.
For the Chocolate Pudding Layer
- 1 1/2 cups whole milk, divided — Using whole milk is key for a rich, creamy texture. You’ll use part of it to mix with the cornstarch first.
- 1/3 cup granulated sugar — Sweetens the pudding without making it cloying, especially with the dark chocolate.
- 3 tbsp cornstarch — This is our thickener. Mixing it with cold milk first prevents dreaded lumps.
- 1/8 tsp fine sea salt — Essential for making the chocolate flavor pop.
- 2 large egg yolks — They add incredible richness and help create a velvety, custard-like consistency.
- 4 oz high-quality dark chocolate (60-70%) — Finely chop this. The quality here directly translates to the flavor of your pudding dessert.
- 2 tbsp unsalted butter — Stirred in at the end for extra gloss and silkiness.
- 1 tsp pure vanilla extract — The classic flavor enhancer that rounds everything out.
For the Strawberry Topping
- 1 lb fresh strawberries, hulled & sliced — About 3 cups. Their bright acidity cuts through the rich chocolate perfectly.
- 2 tbsp granulated sugar — This draws out the berries’ natural juices to create a light syrup.
- 1 tsp fresh lemon juice — A tiny bit of acid keeps the strawberries tasting vibrant and fresh.
For Garnish (Optional)
- 1/2 cup heavy whipping cream, cold — Chilling the cream and your bowl helps it whip up faster and higher.
- 1 tbsp powdered sugar — Sweetens and stabilizes the whipped cream slightly.
- 4 whole strawberries — A simple, pretty finish for the top of each glass.
Instructions to Prepare No-Bake Chocolate Strawberry Pudding Dessert
The process is straightforward, but a few key techniques ensure perfect layers. Here’s how to build your chilled dessert.
- Prepare the crust — Mix the crumbs, sugar, and salt, then stir in the melted butter until it resembles wet sand. Press this firmly into the bottom of four 8-ounce glasses. A firm press is crucial for a crust that holds together when you spoon into it. Chill the glasses while you make the pudding.
- Make the pudding base — In a saucepan, whisk 1/2 cup of the cold milk with the sugar, cornstarch, and salt until smooth. Cook over medium heat, whisking constantly, until it thickens and bubbles. This activates the cornstarch.
- Temper the egg yolks — Whisk the yolks in a bowl. Slowly drizzle in about a third of the hot milk mixture while whisking non-stop, then pour it all back into the pan. This gradual heating prevents scrambled eggs in your pudding.
- Cook to completion — Return the pan to medium-low heat. Cook for 2-3 more minutes, whisking constantly, until very thick and glossy. It should coat the back of a spoon. Remove from heat immediately.
- Finish the chocolate pudding — Add the chopped chocolate, butter, and vanilla to the hot pudding. Let it sit for one minute, then whisk vigorously until completely smooth and glossy.
- Assemble the first layers — Pour the hot pudding evenly over the chilled crusts. Smooth the tops and tap the glasses gently to remove air bubbles. The heat will slightly soften the top of the crust, helping the layers fuse.
- Prepare the strawberry topping — Toss the sliced strawberries with sugar and lemon juice. Let them macerate at room temp for 10-15 minutes. This short maceration creates a light syrup without making the berries mushy.
- Top and chill — Spoon the strawberries and their syrup over the pudding. Cover loosely with plastic wrap (don’t let it touch the berries) and refrigerate for at least 4 hours, or overnight for the best set.
- Optional garnish — Just before serving, whip the cold cream and powdered sugar to soft peaks. Dollop or pipe it onto each dessert and top with a whole berry.
- Serve — Enjoy chilled. The pudding will be fully set and sliceable with a spoon, offering a perfect bite of all three layers.

What Goes Well With No-Bake Chocolate Strawberry Pudding Dessert
This dessert is rich and satisfying on its own, but it can anchor a fantastic dessert course. Here are a few pairing ideas.
- A light sparkling wine — The bubbles and acidity in a Prosecco or Cava cut through the richness of the chocolate beautifully.
- Fresh mint tea — Serving a pot of hot or iced mint tea alongside offers a refreshing, palate-cleansing contrast.
- A cheese plate starter — Begin your meal with a simple board of mild cheeses and crackers. The savory start makes the sweet finale even more enjoyable.
- Buttery shortbread cookies — A couple of crisp, simple cookies on the side add a different texture and are perfect for dipping.
- Vanilla bean ice cream — For the ultimate indulgence, add a small scoop on top. The warm-cold contrast is incredible, even if it’s a bit extra.
Key Tips for Making No-Bake Chocolate Strawberry Pudding Dessert
A few small details make a big difference between a good dessert and a great one. Here is what I’ve learned from making this countless times.
- Press the crust firmly — Don’t just sprinkle the crumbs. Use the bottom of a small glass to compact them into an even, solid layer. This prevents it from crumbling when you spoon into it.
- Chop the chocolate finely — Smaller pieces melt instantly into the hot pudding base, creating a smooth sauce without needing to reheat it and risk overcooking the eggs.
- Constant whisking is non-negotiable — When cooking the cornstarch and egg mixture, never stop whisking, especially at the corners of the pan. This prevents lumps and ensures even thickening.
- Macerate strawberries just before assembling — Letting them sit for the full 10-15 minutes draws out perfect juice, but doing it hours ahead will make them too soft and watery.
- Chill thoroughly — The full 4-hour chill, or better yet overnight, is essential. It allows the pudding to set completely so the layers stay distinct when served.
- Use room temperature ingredients for the crust — The melted butter should be cooled slightly, but not cold. This helps it coat the crumbs evenly for perfect texture.
Creative Variations of No-Bake Chocolate Strawberry Pudding Dessert
The basic formula is wonderfully adaptable. Feel free to play with these ideas for different seasons or flavors.
- Different crusts — Swap the graham crackers for crushed Oreos (leave out the extra sugar) or ginger snaps for a spiced twist.
- Berry medley topping — Use a mix of raspberries, blueberries, and blackberries along with or instead of the strawberries for a summer berry pudding vibe.
- Citrus-infused pudding — Add the zest of one orange to the pudding along with the vanilla for a chocolate-orange flavor combination.
- Mocha version — Dissolve 1-2 teaspoons of instant espresso powder into the milk before making the pudding base for a deep mocha flavor.
- Nutty crunch layer — Sprinkle a thin layer of chopped toasted hazelnuts or almonds between the crust and the pudding for added texture.
Storage Guidelines for No-Bake Chocolate Strawberry Pudding Dessert
Proper storage keeps the textures perfect. Since this is a chilled dessert, the fridge is your best friend.
- Assembled desserts in the fridge — Covered tightly with plastic wrap, they will keep well for up to 3 days. The strawberry layer is best within 24 hours for optimal texture.
- Component storage for freshness — For longer prep, make and refrigerate the crust and pudding layers (covered) for up to 3 days. Add the fresh macerated strawberries just a few hours before serving.
- Avoid freezing entirely — Freezing will cause the pudding to become grainy and separate upon thawing, and the strawberries will turn to mush. It’s not recommended.
- Use the right containers — If not using serving glasses, you can layer this in a single 8×8 dish. Cover it well with plastic pressed directly onto the surface to prevent a skin from forming.
Reheating Tips for No-Bake Chocolate Strawberry Pudding Dessert
This is a firm no-reheat zone. The beauty of this no-bake dessert is its cool, set texture.
- Serve it straight from the refrigerator — This dessert is meant to be enjoyed cold. Any attempt to warm it will melt the pudding and wilt the strawberries.
- If separation occurs — If the pudding seems to have “wept” or separated slightly after days in the fridge, a gentle stir can sometimes re-emulsify it, but the texture won’t be as perfect.
- For a different experience — If you must have something warm, consider serving a warm chocolate sauce on the side for dipping, but keep the actual dessert chilled.
Nutrition Value (Per Serving)
Based on one serving which includes one full 8-ounce glass with all layers and the optional whipped cream garnish.
- Calories: 685
- Protein: 10g
- Fat: 41g
- Carbohydrates: 75g
- Fiber: 6g
- Sugar: 52g
- Sodium: around 280mg
FAQs
Can I use a different type of milk for the pudding?
Whole milk is ideal for the creamiest texture. You can use 2% milk, but the pudding may be slightly less rich. I don’t recommend non-dairy milks for this particular recipe, as they can react differently with the cornstarch and not thicken as reliably.
How long does No-Bake Chocolate Strawberry Pudding Dessert last in the fridge?
Fully assembled, it’s best enjoyed within 24 hours for perfect strawberry texture. You can store it for up to 3 days, but the berries will continue to soften and release more liquid into the pudding layer.
Can I make this dessert in one big dish instead of individual glasses?
Absolutely. Use an 8×8-inch square baking dish. Press the crust evenly into the bottom, then layer the pudding and strawberries on top. You’ll get about 9 servings, and it’s easier for a larger crowd.
My pudding turned out lumpy. What happened?
Lumps usually form if the cornstarch wasn’t fully dissolved in the cold milk before heating, or if the heat was too high and you stopped whisking. For a salvage, you can press the finished pudding through a fine-mesh sieve to remove any lumps before adding the chocolate.
Is it possible to make No-Bake Chocolate Strawberry Pudding Dessert ahead of time?
Yes, it’s an excellent make-ahead dessert. You can prepare the crust and pudding layers up to 3 days in advance, cover, and refrigerate separately. Add the macerated strawberries the day you plan to serve it for the freshest result.
Try These Popular Recipes
- No-Bake Chocolate Strawberry Cheesecake Bars
- No-Bake Chocolate Strawberry Pudding Dessert
- No-Bake Chocolate Strawberry Dessert Lasagna
- No-Bake Chocolate Strawberry Cheesecake Cups
Wrapping Up
This dessert proves that impressive doesn’t have to mean complicated. The process of building the layers is almost as satisfying as eating it. I hope this guide gives you the confidence to make this stunning No-Bake Chocolate Strawberry Pudding Dessert for your next special occasion—or just because Tuesday deserves a great dessert. If you try it, let me know how it turns out for you!
PrintNo-Bake Chocolate Strawberry Pudding Dessert

A luxurious, layered dessert featuring a buttery graham cracker crust, a rich and creamy chocolate pudding made with real dark chocolate, and a vibrant fresh strawberry topping. This elegant treat requires no oven and sets to a perfect, sliceable texture in the refrigerator.
- Prep Time: 25
- Cook Time: 10
- Total Time: 35
- Yield: 4 1x
- Category: Dessert
- Method: No-Cook
- Cuisine: American
Ingredients
- For the Crust:
- 1 1/2 cups graham cracker crumbs (from about 12 full sheets)
- 1/4 cup granulated sugar
- 6 tbsp unsalted butter, melted and cooled slightly
- 1/8 tsp fine sea salt
- For the Chocolate Pudding Layer:
- 1 1/2 cups whole milk, divided
- 1/3 cup granulated sugar
- 3 tbsp cornstarch
- 1/8 tsp fine sea salt
- 2 large egg yolks
- 4 oz high-quality dark chocolate (60-70% cacao), finely chopped
- 2 tbsp unsalted butter, cut into small pieces
- 1 tsp pure vanilla extract
- For the Strawberry Topping:
- 1 lb fresh strawberries, hulled and sliced (about 3 cups)
- 2 tbsp granulated sugar
- 1 tsp fresh lemon juice
- For Garnish (Optional):
- 1/2 cup heavy whipping cream, cold
- 1 tbsp powdered sugar
- 4 whole strawberries
Instructions
- Prepare the crust: In a medium bowl, combine the graham cracker crumbs, 1/4 cup sugar, and 1/8 tsp salt. Pour the melted butter over the mixture and stir with a fork until all crumbs are evenly moistened and the mixture resembles wet sand. Divide the mixture evenly among four 8-ounce serving glasses or ramekins. Use the bottom of a small glass or a tamper to press the crumbs firmly and evenly into the bottom of each vessel. This compact layer is crucial for a crust that holds together when served. Place the glasses in the refrigerator to set while you make the pudding.
- Make the pudding base: In a medium saucepan, whisk together 1/2 cup of the whole milk, the 1/3 cup sugar, cornstarch, and 1/8 tsp salt until no lumps of cornstarch remain. This initial mixing with cold milk prevents the cornstarch from clumping when heated. Place the saucepan over medium heat and cook, whisking constantly, until the mixture thickens, becomes opaque, and just begins to bubble, about 3-4 minutes. This activates the cornstarch’s thickening power.
- Temper the egg yolks: In a separate small bowl, whisk the two egg yolks until smooth. While whisking the yolks continuously, slowly drizzle in about 1/3 of the hot milk mixture from the saucepan. This gradual addition, called tempering, raises the temperature of the yolks without scrambling them. Once incorporated, pour the entire yolk mixture back into the saucepan with the remaining hot base.
- Cook the pudding to completion: Return the saucepan to medium-low heat. Cook, whisking constantly and scraping the bottom and corners of the pan, for 2-3 minutes until the pudding is very thick, glossy, and a few large bubbles break the surface. Do not stop whisking, as the eggs can curdle if the heat is too high or uneven. The pudding should coat the back of a spoon thickly. Remove from heat immediately.
- Finish the chocolate pudding: Add the finely chopped dark chocolate, 2 tbsp of butter pieces, and vanilla extract to the hot pudding. Let it sit undisturbed for 1 minute to allow the chocolate and butter to begin melting. Then, whisk vigorously until the mixture is completely smooth, glossy, and homogenous. If any bits of unmelted chocolate remain, return the pan to very low heat for 10-15 seconds while whisking, then remove.
- Assemble the first layers: Remove the glasses with the chilled crust from the refrigerator. Divide the hot chocolate pudding evenly among the four glasses, pouring it directly over the crust. Use a small offset spatula or the back of a spoon to smooth the top. This hot pudding will slightly soften the top of the crust, helping the layers fuse together. Tap each glass gently on the counter to release any air bubbles.
- Prepare the strawberry topping: While the pudding is still warm, combine the sliced strawberries, 2 tbsp sugar, and lemon juice in a bowl. Toss gently to coat. Let the mixture macerate for 10-15 minutes at room temperature. The sugar will draw out the strawberries’ natural juices, creating a light syrup and intensifying their flavor. Do not prepare this too far in advance, or the strawberries will become mushy.
- Top and chill: After the strawberries have macerated and released some juice, spoon the strawberry mixture evenly over the chocolate pudding layer in each glass, including any accumulated syrup. Cover the glasses loosely with plastic wrap, ensuring the wrap does not touch the strawberry surface. Refrigerate for a minimum of 4 hours, or preferably overnight, to allow the pudding to set completely and the flavors to meld.
- Optional garnish: Just before serving, make the whipped cream. In a chilled metal bowl, combine the cold heavy cream and powdered sugar. Using a hand mixer or a whisk, whip on medium-high speed until soft peaks form—the cream should hold its shape when the whisk is lifted but still have a slight curl at the tip. Over-whipping will lead to grainy, separated butter. Pipe or dollop the whipped cream onto each dessert and garnish with a whole strawberry.
- Serve: Serve the desserts chilled directly from the refrigerator. The layers should be distinct, the pudding fully set and sliceable with a spoon, and the strawberries bright and juicy. For the cleanest presentation, use a parfait spoon or a long dessert spoon.
Notes
Storage: Desserts can be assembled, covered, and stored in the refrigerator for up to 3 days. The strawberry topping is best within 24 hours as it will continue to soften and release liquid. For longer storage, prepare the crust and pudding layers, cover, and refrigerate for up to 3 days, then add the fresh macerated strawberries just before serving. Freezing is not recommended, as the pudding texture will become grainy and the strawberries will turn to mush upon thawing. Reheating: This is a chilled dessert and should not be reheated.
Nutrition
- Calories: 685
- Sugar: 52g
- Sodium: 280mg
- Unsaturated Fat: 23g
- Trans Fat: 41g
- Carbohydrates: 75g
- Fiber: 6g
- Protein: 10g
- Cholesterol: 175mg
Keywords: no bake chocolate strawberry pudding, chocolate strawberry dessert, no bake pudding, easy no bake dessert, strawberry chocolate parfait, layered dessert, refrigerator dessert, summer dessert, chocolate ganache pudding, graham cracker crust, fresh strawberry topping


